Ramblings on Games Rendering and Real-Time Raytracing

a.k.a. what I’ve learned about how games render their worlds and how raytracing works.
So first off, raytracing is pretty neat. We have been rendering movies with it for ages now, and it’s awesome that we can finally do the same in real-time by utilizing the GPU.
Why is this awesome?
Well, it allows us to simulate some effects much more accurately. You might not have noticed this before in games - especially if you’re just an average gamer and don’t push your face against the monitor to inspect those pixels - but some effects can break down very easily under certain situations, or if you rotate the camera in a specific direction.
Before we can dive into that, I want to quickly touch upon how games normally work when you don’t have that sweet sweet RTX turned on.
So, what goes into displaying a game scene onto your computer screen?⌗
This is a complex process called “rasterization”. Don’t worry, I will try to break it down as simple as possible:
So, the game world is made up of a lot of different 3d models. Each of these models is made out of so-called “vertices” - which is pretty much just a glorified 3d point in space, with some other information attached to it. Each of these vertices is then connected in pairs of three, which then form a triangle. These triangles are what you can see in the game. If you have ever taken a look at a low-poly styled game, you’ll already be familiar with what this looks like.
The person who makes these 3D models can also attach other special data to them. For example, we can specify what color each triangle needs to be. Or instead of using a single color, we can tell it to project an image onto the triangle (we call this image a “Texture”). There is more information that we can attach to it, but I won’t go into detail on this.
Now - and this might become a bit math-heavy - we want to somehow convert this 3d model in the scene into pixels that we can show on the monitor. The way we do this is by utilizing quite a bit of matrix maths.
Each object in the scene has a location, a scale, and a rotation. We can combine these three properties into the so-called “transformation matrix” (also often called the “model matrix”). It is a 4x4 matrix that can be calculated by combining a transformation, a rotation, and a scale matrix with the location, the scale, and the rotation of the object, respectively.
While this is very useful, it’s not enough to calculate exactly where on your screen they should show up. For that, we need a matrix called the “view-projection” matrix. While its name is very scary, it is actually pretty simple. It consists of two parts: the “view” matrix and the “projection” matrix.
- The view matrix is in fact nothing more than just the position of the camera and in what way it is looking. It takes the positions of the vertices in the world and transforms them so that each of the model’s vertex positions is as how they would be if they were seen from the camera’s point of view.
- The projection matrix is a little bit more complex: it defines where a vertex should be positioned on your screen. To sell the effect of a 3d world, this matrix can also add a perspective, so that objects far away appear smaller than objects close by.
When we have this, we can multiply the transformation, view, and projection matrix with each other to become the model-view-project matrix (MVP for short). We can use this MVP to transform all of the vertices of that object to calculate the position where that vertex should show up. Of course, if you have a different model with a different location, you need to re-calculate the model matrix. Luckily we can keep the parts of the view and projection matrix if they don’t change.
The neat thing about these matrices is that they are pretty fast to calculate, which is perfect if we want to render millions of pixels to the screen, 60 times or more per second.
Game developers can also specify exactly how they want these 3d models to show up on the screen. They do this by writing small programs called “shaders” which can run in parallel on your GPU.
There are a few different types of shaders, the most common ones are “vertex shaders” and “pixel shaders” (sometimes also called “fragment shaders”).
- The vertex shaders are run for every vertex in your 3d model, and basically do all the hard work of transforming vertices in the game world to pixel coordinates on your monitor
- The pixel shaders are run for every pixel that a certain object takes up on the screen. In these shaders, you calculate the colors that these pixels should have, based on a ton of complicated math.
The issue with rasterization⌗
The main big issue with this is that once we have all objects transformed to points on your screen, we are effectively working on a 2d image that covers your screen. This means that we don’t have access to the geometry of the game world anymore.
Say we have a puddle, and when we look at the water, it should reflect our surroundings (which is what we would expect from any normal puddle). Since we don’t have access to the geometry in the scene anymore, we can only work with the geometry that we have transformed onto the screen, with the model-view-projection matrix.
Racing Trays (oh it’s a race, alright!)⌗
Now, if you have been paying close attention, you might have noticed that when we render the game world in the traditional rasterization way, we work from the game world to the screen: first, we take the model, then project it onto your computer screen, and then apply all sorts of fancy lighting effects. With raytracing, we do this entire process in the other direction: we start from the computer screen, and for each pixel, we shoot rays from the camera into the scene, see if it intersects with anything, and determine the color of the pixel that ray originated from that way.
This comes with the huuuuuge benefit that we are no longer limited by not having access to the scene geometry. Therefore, we can estimate lighting conditions much more accurately. Now, there is a reason that only recently it has become possible to trace rays in real-time: calculating intersections between the rays we shoot out into the scene, and the geometries of the objects in the scene is very expensive.
Modern GPUs which are capable of real-time raytracing have been specially designed to be able to render ray-traced images in real-time. These are GPUs such as the RTX cards from NVIDIA and the RX cards from AMD. They have a large amount of specialized components which are able to compute these intersections very quickly. The NVIDIA cards pack an extra punch with their specialized AI cores, which allow them to increase the resolution of images very quickly, without compromising on the quality of the image. In combination, this allows developers to raytrace their scenes at a smaller resolution (which means less rays to trace, which means faster rendering) such as 720p and scale those up to 4k. The AI cores take over and fill in all the missing details that were lost in rendering the lower-resolution image.
Yes, that’s fancy, but how?⌗
So, the raytracing pipeline adds a bunch of new stuff that game developers can use. To start off, it comes with a few new shader types. I’ll list the most important ones here: (if you’re curious, you can find more info on your own 😉)
- Ray generation shader
- Closest hit shader
- Miss shader
Ray generation shader⌗
The Ray generation shader is a special shader which can spawn rays that the GPU will trace into the scene. Usually they are mapped to your camera position, and shot out into the direction that you’re looking. But it doesn’t necessarily need to be this way! It gives us the freedom that we can just specify and position and direction, and the GPU will trace the rays that way.
This flexibility also allows us to use real-time raytracing for a wide variety of things. Audio is one such example: for reverb, we need to know how big the room is. We could trace rays in a bunch of directions around the player, and measure the size and volume of the room to determine how much reverb we should apply.
Closest hit shader⌗
This shader is invoked for every ray that hits an object in the scene. It is passed information about what the ray hit, as well as some information about where in the world this hit occured.
You might have also noticed the little world “closest” in the name. This is because technically a ray can intersect multiple objects along its path. In some situations it might be useful to know all the intersection points, for that you can use the “any hit” shader - you can read up on this yourself if you are interested.
Miss shader⌗
Of course, a ray might not always hit any geometry in the scene. For example, if you are looking up at the sky, the rays might not intersect with any objects. We can use this shader to give the sky a blue color.
Objects in the scene⌗
I’ve mentioned this before a couple of times, but one of the benefits of using raytracing over rasterization is that we have access to the scene geometry.
Of course, if we have a few thousand objects in the scene, and we need to calculate expensive ray-object intersections for a couple hundred thousand or even a million rays, at least 30 or 60 times per second, we’re going to have a problem.
This is where we use a very smart data structure, called a Bounding Volume Hierarchy (“BVH” for short). In my opinion, this is one of the biggest players that makes real-time raytracing possible.
In short: a Bounding Volume Hierarchy is a tree structure on a bunch of objects in the scene. It gets generated by wrapping all objects with a bounding volume (This is a volume, usually a box, which fits around the object perfectly. Think of the box of your Amazon package, except it is fitted perfectly so you don’t waste any space around the object.). Objects that are close together in the scene then get grouped in a bounding volume, and this is repeated until we build up a tree-like structure.
I think a little visualization might help to explain it:
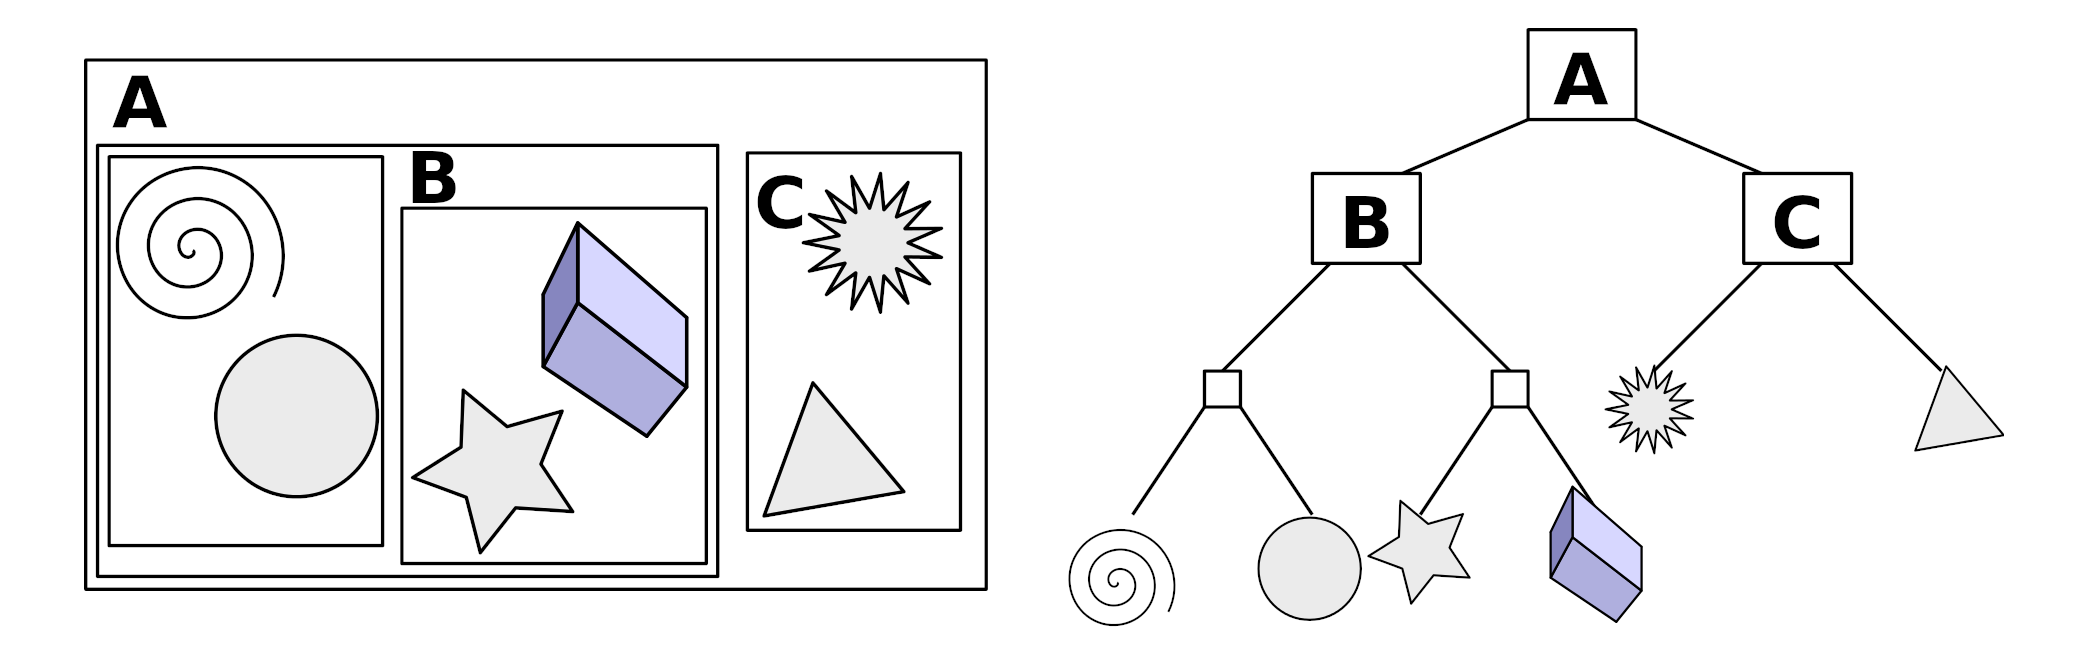 (source: Wikipedia)
The big benefit of this, is that when we trace rays, we first check what bounding boxes we intersect with in the scene, and only take the objects in there to check for the ray-object intersection. By doing this, we only have to check a handful of objects for the ray-object intersection, instead of a lot more.
Benefits of raytracing over rasterization⌗
As it might have already been clear, raytracing allows us to simulate lighting effects a lot more realistically. Traditionally, some effects - such as reflections - had to use workarounds because of the limitations that rasterization imposes on advanced effects in games.
Because we have access to the scene in the BVH, we can do much more with it. Let’s look at some examples:
Shadows⌗
How shadows have always been handled up to now, is to first render the scene from the point of the sun, and then later check if the current pixel was visible to the sun or not. While this is a pretty clever solution, it’s not quite accurate to how shadows work in real-life.
If you have ever walked outside during a sunny day, you might have noticed that the outline of the shadow of your legs is sharper than the shadow from your head.
This is because the sun is not an infinitely small singular point emitting light, but a giant ball millions of kilometers away, with a big area.
It essentially works the same as a solar eclipse.
Locations in the umbra will be completely dark, while locations in the penumbra will be partially dark:
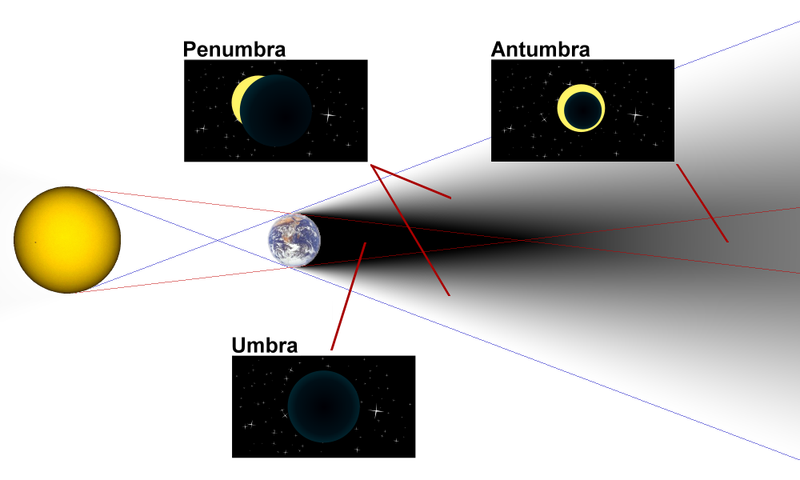 (image source: Travis Dean)
This is hard to achieve in a rasterized way, but is very easy to achieve with raytracing: when you hit a point, simply trace a few rays in the direction of the sun, with a small randomized offset. The darkness of that point depends on the amount of rays that reach the sun light vs the amount of rays that didn’t.
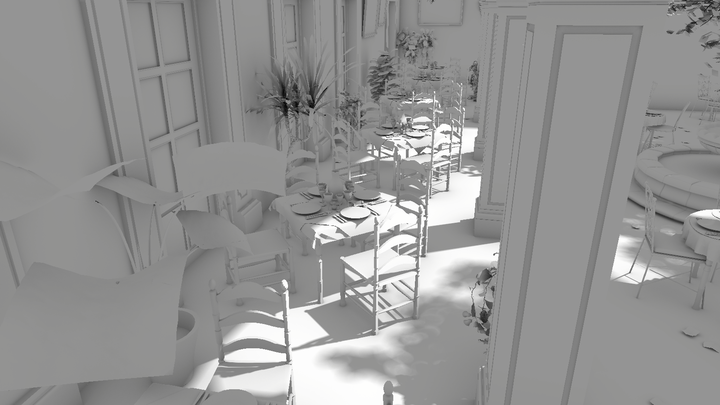
If you apply these simple rules, you can get some nice-looking shadows like below.
As you can see, the shadows from the chair on the ground is much sharper than the shadow from the leaves on the trees (out of frame):
Reflections⌗
A popular way of doing reflections in a rasterized pipeline, is a technique called “screen space reflections” (SSR). The way it works is by reflecting the rendered scene image onto itself. Of course if an object goes off-screen, it cannot be reflected anymore. Also, SSR always has a bit of a blurry reflection. These issues are solved with ray-traced reflections:
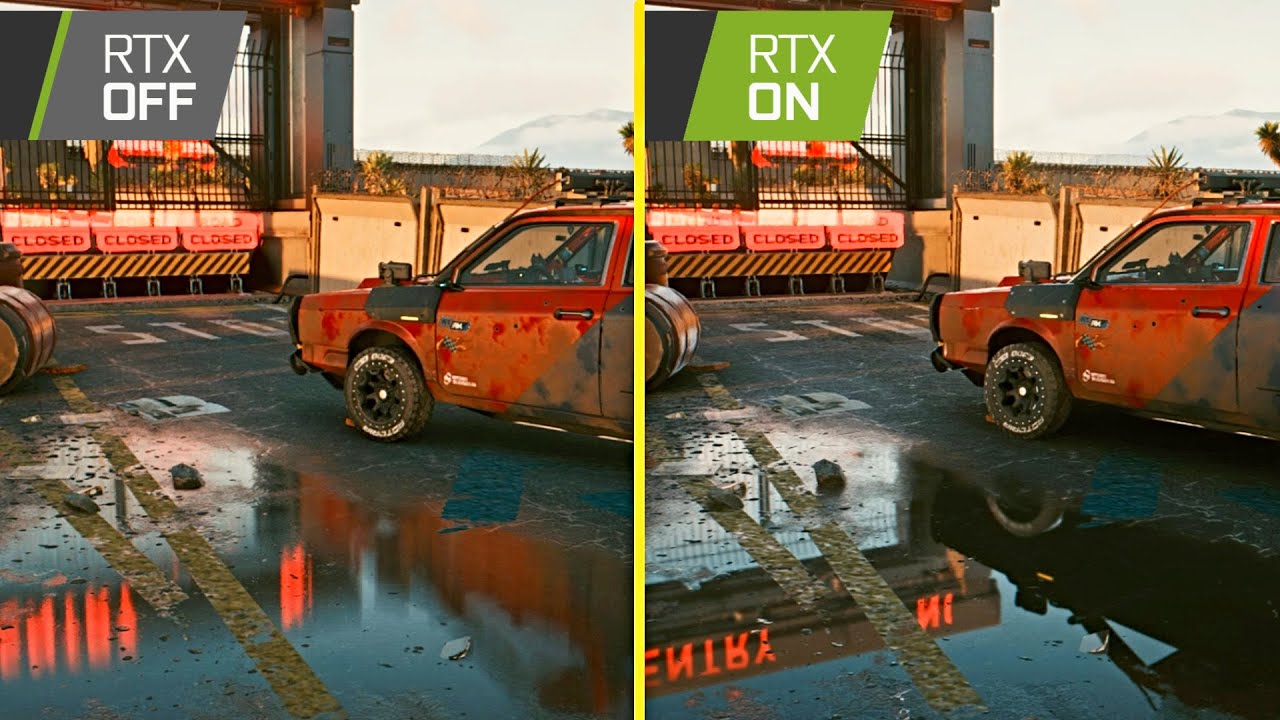 (source: “Ultimate Gamerz” on YouTube)
Global Illumination⌗
Another example of a technique that benefits from having access to the entire scene is global illumination. Global illumination provides light that bounced around the scene. It is the most obvious in this render, where you can see the light from on top, bouncing on the green wall, and ending up on the left side of the box:
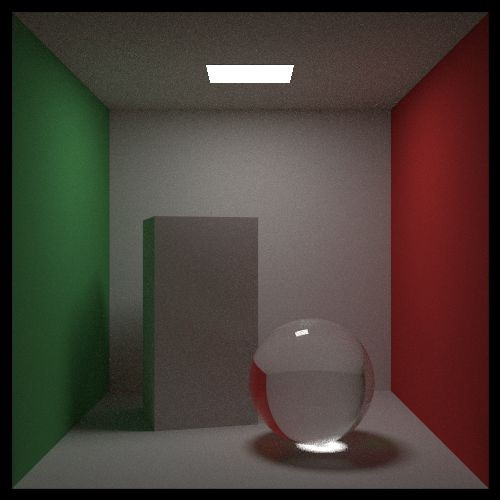 (source: raytracing in one weekend)
Rasterized pipelines usually had to resort to a pre-baked solution, which would be static - meaning that it can’t be affected by real-time light updates, and also take up a long time to bake and view the result.
Ray-traced global illumination provides the benefit that it is real-time, meaning that changes in the environment will be reflected in the lighting. Enjoy another pretty picture:
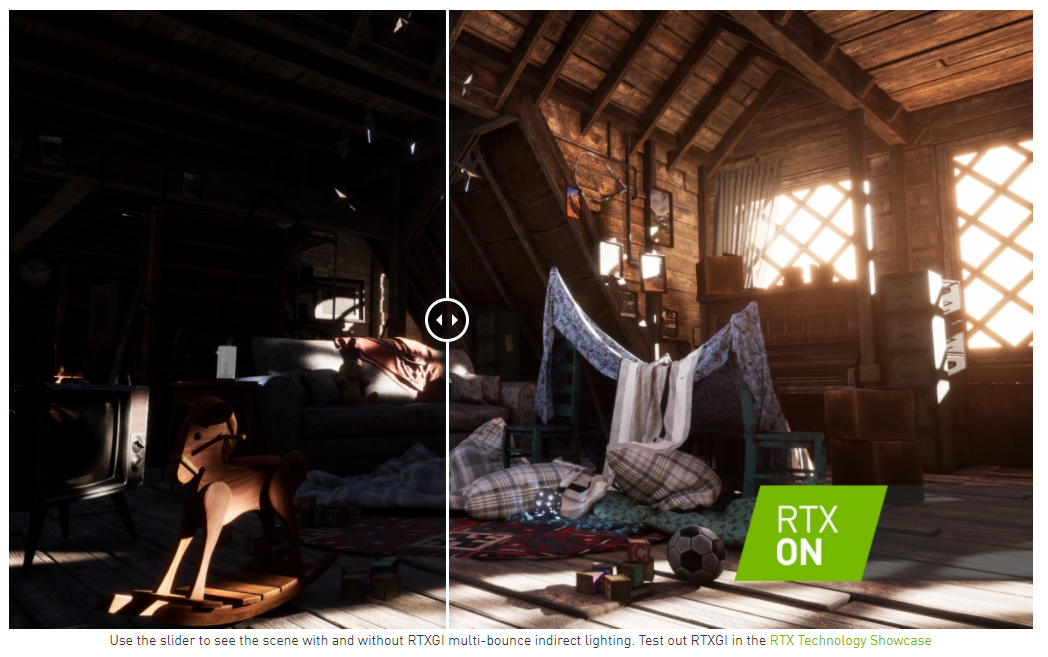 (source: nvidia)
The drawbacks of real-time raytracing⌗
Real-time raytracing isn’t all roses and sunshine, however. While the current GPUs are very powerful, and can do a lot, you still want to minimize the amount of rays that you trace, if you want to target a smooth 60 frames per second.
Because of this, we can’t fully raytrace everything. We have to be smart about what we render with raytracing, and what we do the traditional rasterization way.
Currently, games will still render most of the game objects with rasterization, and only use raytracing for a select few effects, such as these described above here. These games will usually also make heavy use of upscaling technology, where they render most of the game world at a 720p resolution, and then scale the result up to 1080p, or higher.
There is a lot of different strategies that are possible, and a lot of engines and games do it in their own special way.
Closing up⌗
So yeah, there you have it. I think raytracing is pretty awesome, both from a developer and a gamer standpoint.
As a developer, real-time raytracing offers me the simplicity of raytracing to solve problems that required (often very weird/hacky) workarounds to do properly. It is also very awesome that the implementations in the modern APIs are very flexible, and allow for other uses other than just making shiny pixels.
As a gamer, it means that games will look even more realistic, and will become even more impressive. Real-time raytracing is still quite early, and developers are still coming up with new ways to integrate it into their games and applications.
If you have made it all the way to the end of this blog post, thank you! This is the first time I’m doing something like this, so please let me know what you think!